⭐建立一个lvgl项目
要在我们的项目中使用 lvgl ,我们起码需要获取到官方的这两个库:
lvgl(lvgl)核心图形库的官方 GitHub 仓库地址:https://github.com/lvgl/lvgl。
lvgl(lv_drivers)输入输出设备驱动官方 GitHub 仓库地址:https://github.com/lvgl/lv_drivers
我们可以克隆或下载这两个库的最新版本,将它们复制到我们的项目中,然后进行适配。
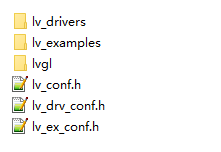
目录 lvgl 就是 lvgl 的官方图形库
目录 lv_drivers 是 lvgl 输入输出设备驱动官方示例配置
目录 lv_examples 是 lvgl 的官方demo(可选,但不要直接使用到实际项目中)
配置文件
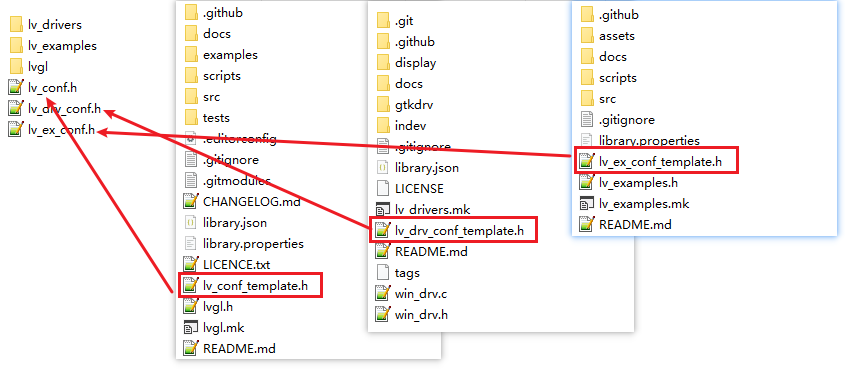
上面的三个库中有一个类似名为 lv_conf_template.h 的配置头文件(template就是模板的意思)。通过它可以设置库的基本行为,裁剪不需要模块和功能,在编译时调整内存缓冲区的大小等等。
将 lvgl/lv_conf_template.h 复制到 lvgl 同级目录下,并将其重命名为
lv_drv_conf.h。打开文件并将开头的#if 0更改为#if 1以使能其内容。将 lv_drivers/lv_drv_conf_template.h 复制到 lv_drivers 同级目录下,并将其重命名为
lv_conf.h。打开文件并将开头的#if 0更改为#if 1以使能其内容。(可选)将 lv_examples/lv_ex_conf_template.h 复制到 lv_examples 同级目录下,并将其重命名为
lv_ex_conf.h。打开文件并将开头的#if 0更改为#if 1以使能其内容。
准备lvgl配置文件

使能配置文件
lv_conf.h 也可以复制到其他位置,但是应该在编译器选项中添加 ``LV_CONF_INCLUDE_SIMPLE`` 定义 (例如,对于 gcc 编译器为 ``-DLV_CONF_INCLUDE_SIMPLE`` ) 并手动设置包含路径。
在配置文件中,注释说明了各个选项的含义。我们在移植时至少要检查以下三个配置选项,其他配置根据具体的需要进行修改:
LV_HOR_RES_MAX显示器的水平分辨率。LV_VER_RES_MAX显示器的垂直分辨率。LV_COLOR_DEPTH颜色深度,其可以是:
8 - RG332
16 - RGB565
32 - (RGB888和ARGB8888)
初始化lvgl
准备好这三个库:lvgl、lv_drivers、lv_examples 后,我们就要开始使用lvgl带给我们的功能了。使用 lvgl 图形库之前,我们还必须初始化 lvlg 以及相关其他组件。初始化的顺序为:
调用 lv_init() 初始化 lvgl 库;
初始化驱动程序;
在 LVGL 中注册显示和输入设备驱动程序;
在中断中每隔
x毫秒调用lv_tick_inc(x)用以告知 lvgl 经过的时间;每隔
x毫秒定期调用lv_task_handler()用以处理与 lvgl 相关的任务。
Windows初始化示例(Cdoe::Blocks)
如果你是基于 windows上的IDE模拟器(推荐) 进行学习,请先 点击这里下载配置好的项目工程 及 windows上的IDE模拟器(Cdoe::Blocks) 用于后面的学习。
1 2 3 4 5 6 7 8 9 10 11 12 13 14 15 16 17 18 19 20 21 22 23 24 25 26 27 28 29 30 | #if WIN32
int APIENTRY WinMain(HINSTANCE hInstance, HINSTANCE hPrevInstance, LPSTR szCmdLine, int nCmdShow)
#else
int main(int argc, char** argv)
{
/*Initialize LittlevGL*/
lv_init();
/*Initialize the HAL for LittlevGL*/
hal_init();
/*Check the themes too*/
lv_disp_set_default(lv_windows_disp);
/*Run your APP here */
#if WIN32
while(!lv_win_exit_flag) {
#else
while(1) {
#endif // WIN32
/* Periodically call the lv_task handler.
* It could be done in a timer interrupt or an OS task too.*/
lv_task_handler();
usleep(5*1000); /*Just to let the system breath*/
lv_tick_inc(5*1000)
}
return 0;
}
|
Linux初始化示例
如果你是基于 Linux开发板 进行学习,请先 点击这里下载配置好的项目工程 用于后面的学习。
1 2 3 4 5 6 7 8 9 10 11 12 13 14 15 16 17 18 19 20 21 22 23 24 25 26 27 28 29 30 31 32 33 34 35 36 37 38 39 40 41 42 43 44 45 46 47 48 49 50 51 | int main(void)
{
/* LittlevGL init */
lv_init();
/* Linux frame buffer device init */
fbdev_init();
/* A small buffer for LittlevGL to draw the screen's content */
static lv_color_t buf[DISP_BUF_SIZE];
/* Initialize a descriptor for the buffer */
static lv_disp_buf_t disp_buf;
lv_disp_buf_init(&disp_buf, buf, NULL, DISP_BUF_SIZE);
/* Initialize and register a display driver */
lv_disp_drv_t disp_drv;
lv_disp_drv_init(&disp_drv);
disp_drv.buffer = &disp_buf;
disp_drv.flush_cb = fbdev_flush;
lv_disp_drv_register(&disp_drv);
//hal_init
lv_disp_set_default lv_windows_disp
/* Linux input device init */
evdev_init();
/* Initialize and register a display input driver */
lv_indev_drv_t indev_drv;
lv_indev_drv_init(&indev_drv); /*Basic initialization*/
indev_drv.type = LV_INDEV_TYPE_POINTER;
indev_drv.read_cb = evdev_read; //lv_gesture_dir_t lv_indev_get_gesture_dir(const lv_indev_t * indev)
lv_indev_t * my_indev = lv_indev_drv_register(&indev_drv);
/*Run your APP here */
/*Handle LitlevGL tasks (tickless mode)*/
while(1) {
lv_task_handler();
usleep(5000);
lv_tick_inc(5*1000);
}
return 0;
}
|